
A maintenance worksite needs a portable, low-speed control point that matches its vehicles, pavement and temporary routes—not a permanent public-road hump chosen by catalogue name alone. By the end, you will be able to specify the required dimensions, modules, anchors, traffic layout and delivery checks before approving a plastic speed bump.
Key takeaways
- Use a portable bump only on a defined vehicle route, not beside an excavation.
- Match bump height and ramp length to vehicle clearance and lane width.
- Join modules, anchor them securely and plan safe removal before installation.
- Verify dimensions, load rating, reflectors, batch details and delivery condition.
Decide whether a portable bump suits the worksite
A plastic speed bump for a maintenance kit worksite in Pune suits a temporary area when its job is to slow vehicles on a defined route, not absorb impacts from reversing plant or protect an excavation.
Use a speed bump for maintenance areas only after confirming that every vehicle crossing it can clear the ramp and carry its load without destabilising.
Pause the choice if any answer is unknown:
- What is the heaviest vehicle and axle load? Obtain the manufacturer’s permitted axle load and vehicle limitations instead of relying on a generic tonne rating.
- Do the bump height, ramp angle, module length and total width suit the lane and the lowest vehicle clearance?
- Does the kit include tapered end pieces? A square edge can catch a pallet jack, strike a low vehicle or create a trip hazard.
- Can you anchor it to the actual surface? Ask for the anchor type, hole diameter, embedment and approved surfaces, especially if the area is dusty, wet, oily or uneven.
- Is it genuinely portable and modular, with parts that can be removed without leaving a permanent road installation?
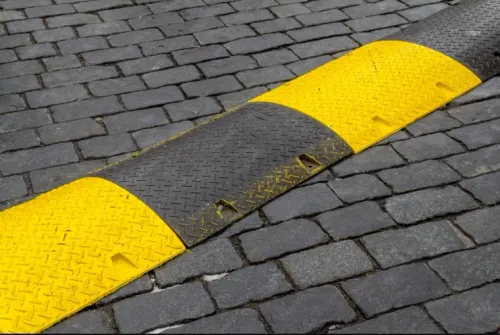
- Does yellow-and-black treatment include retroreflective material, or is it only coloured plastic? Night work needs signs, lighting and a visible route as well.
The bump is suitable only within a wider traffic-control plan: reduce speed before it, mark the pedestrian path, and keep the bump away from reversing vehicles, stored materials and excavation edges. An unanchored unit can creep or rotate under braking and diagonal crossings.
Match the bump to vehicles, lane width and clearance
The bump fits only when its height, ramp angle, module length and load rating match the largest vehicle using the lane. Measure the clear approach width, lane width and lowest underbody point before comparing plastic speed bumps AK1005 in Pune.
| Vehicle | Match before selection | Reject or adjust when |
|---|---|---|
| Cars and vans | Confirm ramp angle, height and underside clearance; leave usable lane width beyond both end caps. | The bumper, exhaust or battery housing can contact the centre section. |
| Forklifts and pallet trucks | Obtain permissible axle load, wheel load and fork-clearance limits; check the transition at each end. | A pallet wheel can catch a square edge, or turning places concentrated load on a joint. |
| Maintenance trucks and ambulances | Check the manufacturer’s vehicle-use restriction, approach angle and emergency-vehicle clearance. | The bump delays an emergency route or exceeds the vehicle’s approved operating limit. |
| Motorcycles and scooters | Provide tapered ends, visible contrast and a low enough profile for stable crossing. | The side edge forces a sharp steering correction or creates a trip hazard. |
Do not use a generic “tonne rating” as proof of suitability. Ask for the permitted vehicle types, axle-load basis, maximum speed, height, ramp angle, module length and fixing-hole layout for the exact model.
For a speed bump for maintenance areas, specify the complete width: centre modules, tapered end caps and any ramps. Compare the quoted assembly with the lane’s turning space, low-clearance vehicles and the route around excavations, reversing zones and stored materials.
A warning sign, lower approach speed and separated pedestrian path remain necessary; the bump is not the traffic-control plan.
Build a traffic-control layout around the bump
Place the speed bump after the first warning point, not at the start of the work zone. Reduce vehicles to a low operating speed before they reach it, then provide a straight approach with enough stopping sight distance for cars, vans, forklifts and maintenance trucks.
- Put a visible warning sign upstream, where drivers can read it before entering the cone taper. Add retroreflective material or lighting if the site operates after dark.
- Use cones to taper traffic into the controlled lane, leaving the full usable width for the largest permitted vehicle. Do not force a forklift or ambulance across the bump at an angle.
- Install the modular bump square across the lane, with tapered end sections. Keep it clear of excavations, reversing areas and material storage; a speed bump for maintenance areas is not a substitute for those separations.
- Place rigid barriers around the excavation or plant, leaving no gap that a pedestrian could mistake for an access route. Keep a traffic marshal on the approach side where approaching drivers and workers remain visible.
- Mark a separate pedestrian route behind the barrier, away from vehicle turning paths. Provide a protected crossing only at a point the marshal can see, and keep the work zone’s exit route unobstructed.
This arrangement makes the bump one part of worksite traffic control in Pune, not the entire control system. Yellow-and-black plastic improves daytime recognition, but verify that its yellow panels are retroreflective rather than merely coloured plastic. Recheck the layout whenever the maintenance area, stored materials or vehicle route moves.
Specify modular joining, anchoring and relocation
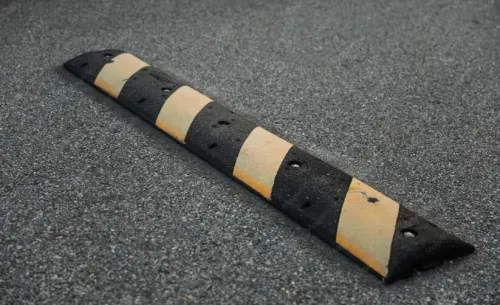
Lay the centre modules on a clean, aligned surface, connect their interlocking ends, and fit tapered end pieces on both sides. A square edge can strike tyres, catch a pallet jack, or create a trip point. Confirm that fasteners, end caps and ramps are included rather than treating them as optional extras.
- Mark the intended line across the lane, then join the modules without gaps or raised joints.
- Anchor the assembled bump when vehicles brake, turn or cross diagonally. Unfixed sections can creep, separate or rotate on dusty, wet, oily or uneven pavement.
- Use only the fixing system specified for that surface. Require the anchor type, hole diameter and recommended embedment, and confirm approval for asphalt, concrete, pavers or temporary flooring.
- Inspect every joint and anchor, then push each section sideways to check for rocking. Run a controlled vehicle crossing at the planned low speed and stop if the bump moves, a fastener loosens or a vehicle grounds out.
- Close the temporary lane before removal. Remove anchors with the specified tool, lift modules rather than dragging them, and inspect the pavement for damage or exposed holes.
- Clean, label and store the modules, end pieces and fasteners together for the next deployment.
For plastic speed bumps AK1005 in Pune, the catalogue code proves little by itself. Compare the supplier’s verified joining and fixing details. The same rule applies when choosing a plastic speed bump for maintenance kit worksite in Pune: relocation is practical only when the complete modular system can be safely dismantled and rebuilt.
Buy against a verifiable specification and inspect delivery
Require a written, model-specific specification before ordering. A temporary maintenance bump is not a permanent public-road hump, so do not copy IRC geometry without checking your vehicle mix, pavement, stopping distance and emergency access. Ask the plastic speed bump supplier in Pune to itemise the complete system.
1. Record the centre-module length, overall width, height, ramp angle and lane coverage. Confirm that low-clearance cars, vans, ambulances and maintenance trucks can cross without grounding.
2. Obtain the manufacturer’s permissible axle load and vehicle-use limits for forklifts, pallet trucks, motorcycles and loaded light commercial vehicles. Reject a generic “multi-tonne” claim with no axle-load basis.
3. Require separate line items for centre modules, tapered end caps, joining hardware, pavement fasteners and any side ramps. Missing end pieces leave square edges that catch pallet trucks and create trip points.
4. Specify the fixing method for your pavement and request installation instructions, removal steps and replacement-fastener details. Check that the modules align tightly and do not rock under a test crossing.
5. Confirm whether yellow panels contain retroreflective material or are only coloured plastic. If the area operates after dark, require night-visibility details; the bump still needs warning signs, lighting and a controlled approach.
On delivery, count every module and fastener, inspect for cracks, warped edges, loose inserts, faded panels and damaged reflective surfaces, then photograph the batch and dimensions. AI Sales Corporation can be asked to place these checks and the intended vehicle limits on the quotation.
Treat the bump as one part of worksite traffic control in Pune, not a substitute for cones, pedestrian separation or a traffic marshal.
Related product
 | Traffic Safety Equipments Durable Traffic Safety Solution in Pune AI Sales Corporation, Pune offers high-quality Plastic Speed Bumps AK1005, designed to effectively control... View product → |
Frequently asked questions
When does a portable plastic speed bump suit a maintenance worksite?
Use one when you need to slow vehicles on a defined temporary route. Do not use it to absorb reversing-plant impacts or protect an excavation.
How do you match a plastic speed bump to vehicles and lane width?
Check the bump height and ramp profile against vehicle ground clearance, wheelbase and approach speed. Confirm that the assembled length fits the lane without creating unsafe pinch points.
What traffic controls should surround a speed bump?
Use advance warning signs, cones or barriers, lane markings and a clear bypass where needed. Keep pedestrians separated from moving vehicles and maintain visibility at approaches.
How should modular speed-bump sections be installed?
Join sections tightly, align the ends with the travel path and anchor them using the specified fixings for the surface. Plan removal so loose hardware and trip hazards do not remain.
What should you verify before accepting delivery?
Compare the delivered modules with the purchase specification, including dimensions, colour, reflectors, joining hardware and load rating. Inspect for cracks, distortion, missing parts and damaged packaging.